Well, my eldest son turned 23 last month and for his birthday he wanted me to make him an amplifier cover for his new guitar amp. I was skeptical but at the same time thought, “How hard can it be?” Once he began giving me his specifications I thought, “Oh boy, what have I gotten myself into?” He wanted it quilted and he wanted an outside pocket as well as some sort of inner protective barrier (he suggested cardboard but I had a better idea). I took careful measurements of his amp.
I purchased some navy blue duck cloth (or canvas). For an inner liner I used 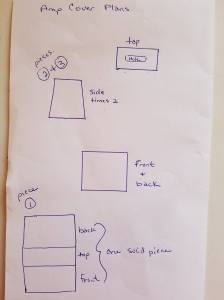 a dark green sheet (the elastic had worn out), cotton batting and “midnight” double fold bias tape to finish off the bottom edge as well as the handle hole.
The first thing I did was to take my measurements and make the front, back and top of the cover one complete piece. I had measured each side of the amp, so I just added my measurements together. I would have 3 main pieces, the two sides and the one big piece for the front, back and top. Then I added 3/4 inch seam allowance around the sides as well as the large piece. I began by cutting out the inside fabric (sheet). I then cut the canvas to match, and finally cut the cotton batting the same size.
I pinned the 3 pieces together and quilted them with diagonal straight line quilting 1.5 inches apart with matching thread (navy blue). I used my 1880’s Domestic treadle for all sewing and quilting as it can handle very thick layers. My next step was to make the handle hole at the center of the top. First I sewed a straight line on each side of the big piece to mark exactly where the top was and did my measurements from those lines for sake of precision.
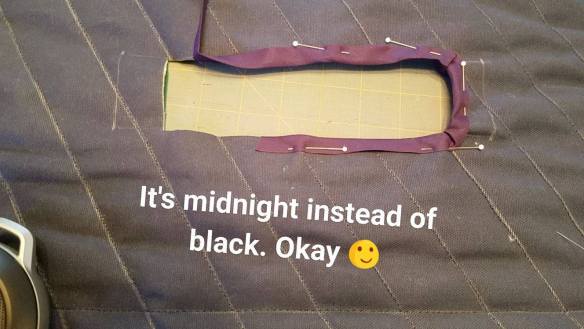
You can see the chalk lines from the quilting and the measurement for the lines defining the top of the amp cover. I had initially thought “midnight” binding would be black, but it was not. Pinned the binding on and applied.
My son wanted some kind of protective barrier on the inside front and back of the cover. I thought quilting template might work better than cardboard. I didn’t want to use something that might deteriorate if moist. However, the only pieces of quilting template I could find were not big enough for the measurements of the front and back of the amp. I did some searching on the internet and found “2 Thick Flexible Lightweight 25x23x1/16 Translucent Polyethylene Plastic Stencil Template Sheet” on Amazon. I liked that it was thicker and I could cut each piece down to fit.
Before sewing the sides on, I cut two pockets to slide the plastic into. I used the measurements for the front and back but only went up about 2/3 of the total height of the piece, finished the top of each pocket piece (rolled 1/4 inch down twice and stitched) and pinned each pocket into place on the insides of the large quilted piece. I wanted the plastic to be removable so the cover could be washed if needed.
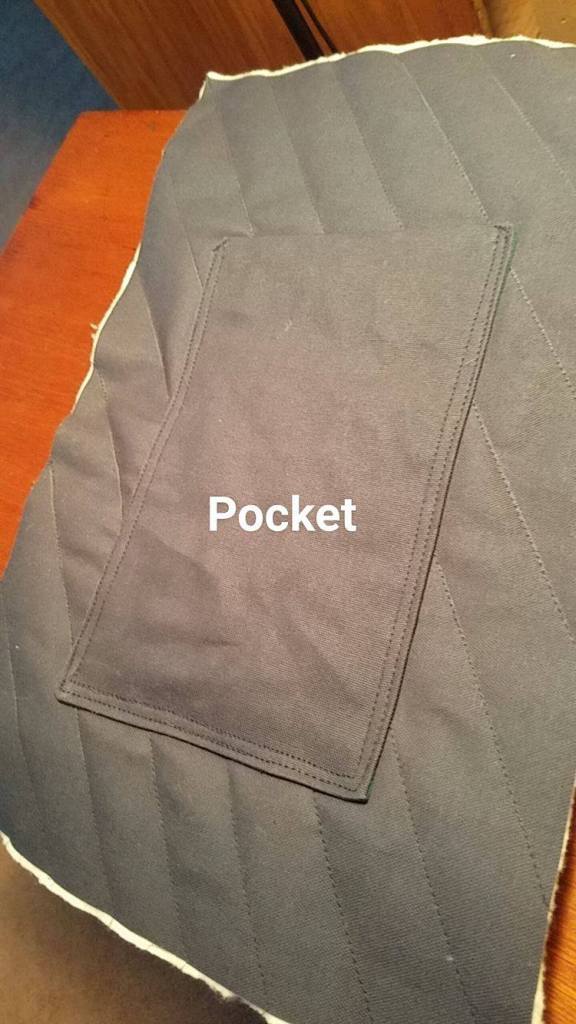
My son wanted a pocket on one side of the cover to carry the amp cable in. I wasn’t sure about it due to all the thicknesses. But I thought I’d try. I cut a piece of inside fabric and then the canvas to match (6.5 x 10.5 inches). I stitched them together almost all the way around. Trimmed the corners, then turned them right side out and tucked in the open (unsewn) part. Pinned it on and sewed it twice for stability. I did some extra sewing along the top of each side for strength.
Next, I pinned one side in place, wrong sides out. To do this, I matched the top corners of the sides with the horizontal lines I had sewn in to mark the top, pinned each. Then I pinned the sides, matching the bottoms. I stitched the side piece in place, carefully pivoting and easing at the corners so I wouldn’t get any puckers. Stitched again to strengthen the seam. Clip corners. Repeat the process on the second side. (Sorry I don’t have more pictures, I didn’t think of posting this until finished.)
I trimmed down the seams to within 1/4 inch and used double fold bias tape and sewed it over the seams so the cotton batting wouldn’t get fuzzies on the amp and it would look nicer. I trimmed up the bottom to make it even and sewed the double fold bias tape to finish the bottom. I then machine washed it to get rid of the chalk lines and let it air dry. I cut each plastic piece to fit and tucked them inside each front and back pocket. 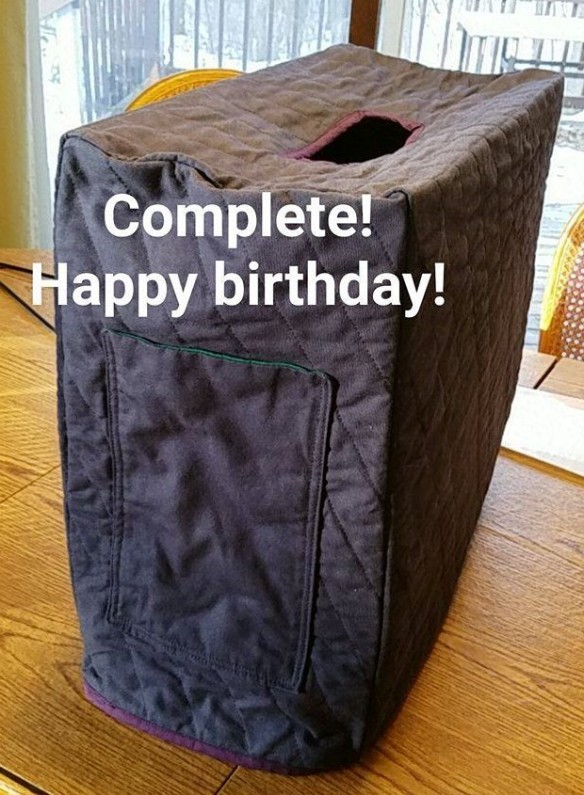
Here is a short video of the outside and another short one of the inside.
Now to take it to the son’s and see if it fits well and he likes it 🙂
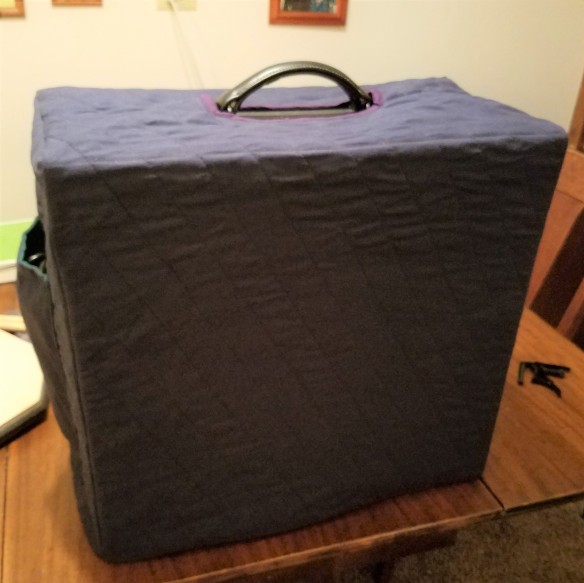
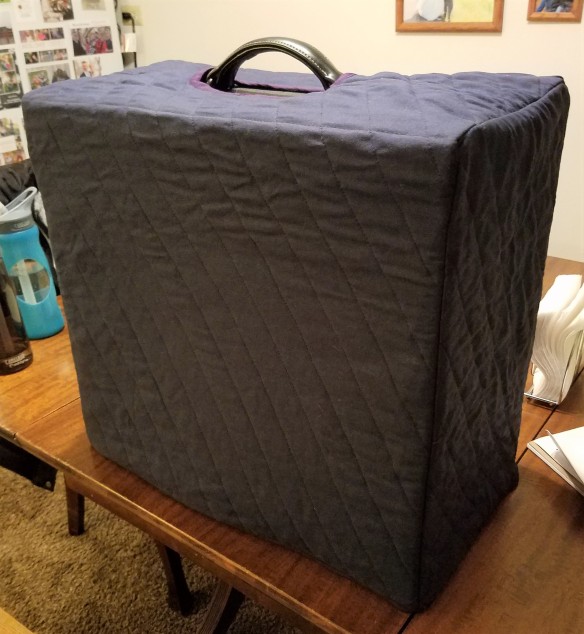
Perfect fit and he thinks it “cool.” YAY!

Nice. More detailed than the xylophone cover made for my son, back in junior high.
Thanks Cheryl. My son knew what he wanted, which was helpful 🙂